|
복잡한 프로그램일 수록 기본적인 설계단계에 있어 항상 다음과 같은 사항을 고려하지 않을 수 없습니다.
공통적 부분의 재사용성, 의존성 등 그리고 이런 고민은 어떻게 하면 효율적으로 사용자 인터페이스와 데이터를 시각적으로 연결 시켜주어야 할지 고민하기 마련 입니다.
이런 문제점을 해결하고자 많은 아키텍처 패턴들이 나와있습니다.
WPF는 그중에서 MVVM 아키텍처 패턴을 대해 완벽히 지원하고 권장하는 프레임워크 입니다. MVVM 아키텍처 패턴(이하 MVVM)은 사용자 인터페이스(뷰)영역과 비즈니스 로직을 분리시켜 의존성을 없애고 디자이너는 UX 중점으로 집중하고 개발자는 데이터 중심으로 접근 개발이 가능합니다.
(대부분 현실에서는 디자인 개발도 개발자 몫이긴 하겠지만..)
그럼 WPF에서 어떻게 MVVM을 적용해서 사용할 수 있는지, 그리고 현실적 타협(?)으로 최대한 MVVM패턴에 위배 되지 않게 어떻게 사용 할지에 대해 살펴보겠습니다. MVVM 패턴이란MVVM 패턴은 2005년 Microsoft에서 WPF 설계자중 한명인 존 구스만(John Gossman)이 발표했습니다.
MVVM 패턴은 뷰와 뷰모델간 서로 통보 처리를 위한 바인딩 기술이 핵심인데 WPF는 이러한 부분이 솔루션 스택에서 바인더를 제공합니다.
MVVM 패턴은 바로 바인딩을 통해 뷰 영역과 비즈니스 로직 및 데이터를 ‘분리’ 시켜 설계하도록 하는 것이 목표 입니다. 모델(Model)
모델은 도메인 모델(데이터 엔티티, 엔티티의 속성 및 메서드)과 해당 되는 데이터를 처리하는 비즈니스 로직이 포함된 부분이라고 생각하면 됩니다.
가령 주문 시스템을 만든다고 하면 결제에 필요한 속성들과 데이터 조작 메서드 등, 주문 취소에 필요한 데이터 속성들 등 뷰(View)
사용자에게 보여지는 화면 입니다. 사용자에게 데이터들을 어떻게 표시하고 배치하는지에 대한 정보만 기술하고 있으며,
사용자와 상호 작용(마우스, 키보드 동작 등)은 바인딩을 통해 뷰 모델로 전달되어 집니다. 뷰 모델(ViewModel)
뷰에 대한 추상화 정보 입니다. 사용자의 상화작용에 대한 동작을 구현하고 그에 대한 데이터 처리 등을 모델을 통해 데이터를 가공할 수 있으며,
바인딩을 통해 다시 뷰에게 통보 역할을 합니다. 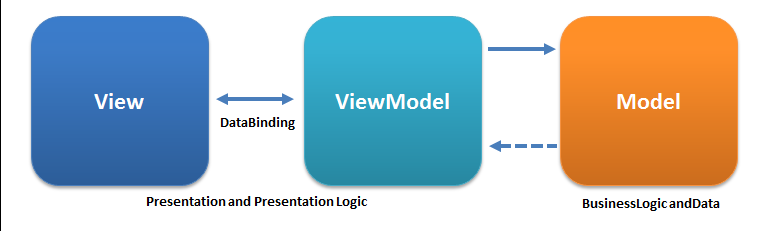
(이미지 출처 : https://ko.wikipedia.org/)
MVVM 패턴은 위 이미지 처럼 뷰와 데이터 처리를 분리 하고 데이터 처리 담당은 뷰모델과 모델로 전담 하여 의존성을 차단하고 있습니다. 뷰와 뷰모델간 바인딩뷰와 뷰모델의 바인딩 처리 방식은 여러가지가 있을 수 있습니다. 여기서 바인딩 처리는 뷰에서의 데이터 바인딩 처리를 뜻하는 것이 아니고
뷰 <– –> 뷰 모델 간의 연결 방식 처리를 말합니다.
쉽게 뷰에서 직접적으로 뷰모델을 연결할 수 있습니다. 가령 이런식으로
public MainWindow()
{
  InitializeComponent();
  this.DataContext = new MainViewmodel();
}
뷰의 코드비하인드에서 뷰모델 인스턴스를 생성하는 방법 또는
<Window x:Class="WpfApp.MainWindow"
        xmlns="http://schemas.microsoft.com/winfx/2006/xaml/presentation"
        xmlns:x="http://schemas.microsoft.com/winfx/2006/xaml"
        xmlns:d="http://schemas.microsoft.com/expression/blend/2008"
        xmlns:mc="http://schemas.openxmlformats.org/markup-compatibility/2006"
        xmlns:local="clr-namespace:WpfApp"
        mc:Ignorable="d">
    <Window.DataContext>
        <local:MainViewmodel/>
    </Window.DataContext>

    ... [생략] ...
이런식으로 xaml에서 직접 뷰모델 인스턴스를 생성하여 사용하는 방법 위 방법은 모두 뷰모델을 뷰에서 강력한 참조로 사용하고 있어 뷰와 뷰모델간 서로 의존성이 있지만 (개인적 생각으로는) 위 또한 MVVM 패턴을 강력히 위배 하는 행위는 아닙니다.
MS Docs 의 MVVM 패턴 내용이나 다른 MVVM 패턴 내용에 대해서도 ‘뷰가 직접적으로 뷰 모델을 참조해서는 안된다’ 라는 내용은 없습니다.
하지만 분리 라는 중점을 보았을땐 확실히 좋은 방법은 아닙니다. 그럼 또 다른 방법은 무엇이 있을까요?
바로 뷰에서 직접 생성 및 참조 하지 않고 외부 즉 바깥쪽에서 뷰모델을 생성하여 설정해 주는 방법이 있습니다. 대략적인 코드로 표현 하면
public class ViewModelProvider : INotifyPropertyChanged
{
  public event PropertyChangedEventHandler PropertyChanged;

  private BaseViewModel _viewModel
  public BaseViewModel ViewModel
  {
    get => _viewModel;
    set
    {
      _viewModel = value;
      OnPropertyChanged();
    }
  }


  public void OnPropertyChanged([CallerMemberName] string propertyName = null)
  {
    PropertyChangedEventHandler handler = this.PropertyChanged;

    if (handler != null)
    {
      handler(this, new PropertyChangedEventArgs(propertyName));
    }
  }
}
[App.xaml.cs] protected override void OnStartup(StartupEventArgs e)
{
ViewModelProvider viewModelProvider = new ViewModelProvider();
viewModelProvider.ViewModel = new MainWindowViewModel();
MainWindow window = new MainWindow();
window.DataContext = viewModelProvider.ViewModel;
mainWindow.Show();
}
위 코드와 같이 뷰모델 생성을 담당하는 외부 ViewModelProvider가 뷰를 생성하면서 DataContext를 설정하는 방식 입니다.
뷰가 변경 될때 ViewModelProvider의 ViewModel속성만 변경해주면 됩니다.
위와 같은 방법은 뷰와 뷰 모델 간 강력한 참조를 없애고 서로간 분리가 되어 한쪽에 문제가 발생 되어도 프로그램 빌드나 유닛 테스트 자체는 실행 가능합니다. 뷰 전환 방법 1이때 뷰의 변경은 ContentControl에 바인딩을 해두고 각 뷰 모델 타입에 대한 DataTemplate을 정의해서 뷰를 변경할 수 있습니다.
위에서 메인 윈도우에 DataContext를 설정했으므로 메인 윈도우가 가지고 있는 ContentControl의 Content 바인딩은 해당 DataContext타입을 따릅니다.
즉 ViewModelProvider의 ViewModel속성 하나로 해당 속성에 뷰 모델 인스턴스를 교체해 가면서 뷰를 변경하는 것 입니다.
[MainWindow.xaml] <Window x:Class="WpfApp.MainWindow"
xmlns="http://schemas.microsoft.com/winfx/2006/xaml/presentation"
xmlns:x="http://schemas.microsoft.com/winfx/2006/xaml"
xmlns:d="http://schemas.microsoft.com/expression/blend/2008"
xmlns:mc="http://schemas.openxmlformats.org/markup-compatibility/2006"
xmlns:local="clr-namespace:WpfApp"
mc:Ignorable="d">
<Grid>
<ContentControl Content="{Binding .}" />
</Grid>
</Window>
[App.xaml] <Application x:Class="WpfApp.App"
xmlns="http://schemas.microsoft.com/winfx/2006/xaml/presentation"
xmlns:x="http://schemas.microsoft.com/winfx/2006/xaml"
xmlns:views="clr-namespace:WpfApp.Views"
xmlns:viewModels="clr-namespace:WpfApp.ViewModels">
<Application.Resources>
<DataTemplate DataType="{x:Type viewModels:뷰1ViewModel}">
<views:뷰1유저컨트롤/>
</DataTemplate>
<DataTemplate DataType="{x:Type viewModels:뷰2ViewModel}">
<views:뷰2유저컨트롤/>
</DataTemplate>
... [View DataTemplate 3] ...
</Application.Resources>
</Application>
ContentControl의 Content는 유저컨트롤(UserControl)만 가질 수 있습니다.
이렇게 각 뷰에 대한 DataTemplate 을 각각 정의해 두고 DataTemplate의 DataType은 해당 뷰에 맞는 뷰 모델 타입을 설정하면
해당 ContentControl의 Content가 바인딩되어 있는 경우 System.Windows.FrameworkElement 클래스의 ApplyTemplate() 메서드로 인해서 해당 뷰 리소스, App 프로그램의 리소스에 접근해서 바인딩 타입에 맞는 DataTemplate 을 적용 해 줍니다.
viewModelProvider.ViewModel = new 뷰2ViewModel()
위 처럼 viewModelProvider에 바인딩 되어 있는 ViewModel에 뷰 모델 교체시 해당 타입에 맞는 DataTemplate을 찾아 ContentControl 에 적용됩니다. 다른 뷰 모델에서는 Event Aggregator 패턴을 활용해서(MVVM Light 라이브러리에서는 GalaSoft.MvvmLight.Messaging.Messenger 클래스로 자체 제공 됩니다.) ViewModelProvider개체에 ViewModel 변경 통보를 발생시켜 뷰 모델을 교체시켜주면
해당 뷰 모델의 타입에 맞는 DataTemplate이 메인 윈도우 ContentControl에 적용되어 전환 되는 방식 입니다. 하지만 이 방법은 단점이 있습니다.
뷰와 뷰 모델간 N:1 매칭이 안됩니다. 디자인이 다른 뷰 여러개와 뷰 모델 하나의 설정이 힘듭니다.
하나의 뷰에서 일뷰 디자인이 상황에 따라 변경 처리가 되어야 하는 경우는 System.Windows.Controls.DataTemplateSelector 을 사용해서
처리해도 되지만 화면 디자인중 여러 부분이 다르고 다소 복잡한 화면이라면 차라리 뷰를 따로 디자인해서 나누고 하나의 뷰 모델을 사용하는 것이 더 효과적일 수 있습니다.
DataTemplate의 DataType 내부적으로 리소스의 Key로 관리 되기 때문에 하나의 DataType만 정의가 가능하므로 뷰와 뷰 모델은 1:1 설정으로만 이루어질 수 있습니다.
(DataTemplate의 DataType이 여러개 정의 되어 있을때 런타임시 익셉션 발생) 위 처럼 여러개의 DataType을 정의하면 런타임시 익셉션이 발생 됩니다.
또 하나의 단점은 뷰가 표시 될때 무조건 재 생성 되어 렌더링 처리 되는데 이 부분은 추가 작접을 통해 캐시 처리 등을 구현해야 하는 번거로움과 효율적인 캐싱을 하려면 개발자의 역량을 필요로 하는 단점이 있습니다. 뷰 전환 방법 2위에서는 뷰 모델을 교체하면 자동으로 해당 뷰 모델에 맞는 뷰가 표시 되도록 DataTemplate을 사용하는 방법으로 뷰 전환에 대해 설명했습니다.
그리고 이 방법에 대한 단점을 설명했습니다. 두번째 방법으로는 Frame를 이용한 뷰 전환 방법 입니다.
Frame은 탐색기능을 제공하는 컨트롤로 UserControl 및 Page를 표시할 수 있습니다. Frame을 사용하면 위에서 설명한 단점은 해결할 수 있지만
뷰 모델 설정 방식을 부모 윈도우 설정으로는 사용할 수 없습니다. 첫 번째 방법은 메인 윈도우에 설정된 DataContext의 뷰 모델 타입에 맞는 DataTemplate이 ContentControl에 바인딩 되서 뷰를 전환 하는 방법이었는데
Frame은 특성상 Frame으로 표시 되는 Content는 부모의 DataContext를 의존 하지 않고 별도 격리로 관리 되어 집니다. 그렇기 때문에 각 뷰 별로 뷰 모델을 직접 설정해 주어야 합니다. 각 뷰에 뷰 모델을 설정하는 방법은 DI(Dependency Injection)를 사용하는 IoC Containers 사용으로 처리 합니다.
DI와 IoC에 대한 설명은 다음 링크에서 통해 자세한 내용을 볼 수 있습니다.
Martin Folwer의 Inversion of Control Containers and the Dependency Injection pattern
프로그램 실행시 뷰 모델을 관리하는 IoC 인스턴스를 생성해서 IoC를 통해 뷰 모델을 꺼내와 뷰와 연결해 줍니다.
이때 IoC 내에서 뷰 모델 인스턴스가 생성될때 의존되어 있는 개체는 생성자 주입(Constructor Injection)방식으로 주입 시켜 줍니다. 지금까지 설명한 방식을 코드로 구현해 보겠습니다. 먼저 간단한 DI처리를 지원하는 IoC를 구현해 보았습니다.
[SimpleIoC.cs] using System;
using System.Linq;
using System.Collections.Generic;
public class SimpleIoC
{
Dictionary<Type, Func<object>> _registrations = new Dictionary<Type, Func<object>>();
public void Register<TService, TImpl>() where TImpl : TService
{
_registrations.Add(typeof(TService), () => this.Resolve(typeof(TImpl)));
}
public void Register<TService>(Func<TService> instanceCreator)
{
_registrations.Add(typeof(TService), () => instanceCreator());
}
public void RegisterSingleton<TService>(TService instance)
{
_registrations.Add(typeof(TService), () => instance);
}
/// <summary>
/// 싱글톤으로 등록
/// </summary>
/// <typeparam name="TService"></typeparam>
/// <param name="instanceCreator"></param>
public void RegisterSingleton<TService>(Func<TService> instanceCreator)
{
var lazy = new Lazy<TService>(instanceCreator);
this.Register<TService>(() => lazy.Value);
}
public object Resolve(Type serviceType)
{
Func<object> creator;
if (_registrations.TryGetValue(serviceType, out creator)) return creator();
else if (!serviceType.IsAbstract) return this.CreateInstance(serviceType);
else throw new InvalidOperationException("No registration for " + serviceType);
}
private object CreateInstance(Type implementationType)
{
var ctor = implementationType.GetConstructors().Single();
var parameterTypes = ctor.GetParameters().Select(p => p.ParameterType);
var dependencies = parameterTypes.Select(t => this.Resolve(t)).ToArray();
object instance = Activator.CreateInstance(implementationType, dependencies);
return instance;
}
public void Release()
{
_registrations.Clear();
}
}
대략 이런식으로 IoC클래스를 구현할 수 있습니다. 그리곤 저 클래스 기반으로 뷰 모델을 관리하고 뷰 와 연결할때 사용되는 클래스를 구현해 봅니다.
[ViewModelLocator.cs] using System;
using System.Collections.Generic;
public class ViewModelLocator : SimpleIoC
{
public ViewModelLocator()
{
}
public MainViewModel MainViewModel
{
get
{
return (MainViewModel)base.Resolve(typeof(MainViewModel));
}
}
public 뷰1ViewModel 뷰1ViewModel
{
get
{
return (뷰1ViewModel)base.Resolve(typeof(뷰1ViewModel));
}
}
public 뷰2ViewModel 뷰2ViewModel
{
get
{
return (뷰2ViewModel)base.Resolve(typeof(뷰2ViewModel));
}
}
}
각 뷰 모델에 대한 속성이 나열되어 있고 해당 속성은 IoC에 의해 인스턴스가 생성되서 반환 되어 지는 간단한 뷰 모델 관리 IoC를 다음과 같이 구현해 보았습니다.
이렇게 만든 ViewModelLocator는 App 리소스에 정의해서 프로그램 실행시 최초 한번 인스턴스를 생성해서 사용할 수 있습니다.
[App.xaml] ... [기타 생략] ...
<Application.Resources>
<ViewModel:ViewModelLocator x:Key="ViewModelLocator" />
</Application.Resources>
... [기타 생략] ...
그럼 뷰 에서 뷰 모델을 연결해 보겠습니다.
[MainWindow.xaml] <Window x:Class="MainWindow"
xmlns="http://schemas.microsoft.com/winfx/2006/xaml/presentation"
xmlns:x="http://schemas.microsoft.com/winfx/2006/xaml"
xmlns:d="http://schemas.microsoft.com/expression/blend/2008"
xmlns:mc="http://schemas.openxmlformats.org/markup-compatibility/2006"
DataContext="{Binding MainViewModel, Source={StaticResource ViewModelLocator}}"
... [기타 생략] ...
StaticResource로 접근해서 위에서 정의한 ViewModelLocator를 통해 메인 윈도우의 뷰 모델을 설정 할 수 있습니다.
마찬가지로 다른 뷰에서도 위 처럼 해당 뷰 모델을 설정 할 수 있습니다. 그럼 화면 전환을 위해 메인 윈도우에 Frame을 배치하고 뷰 전환을 구현해 보겠습니다.
[MainWindow.xaml] ... [기타 생략] ...
<Grid>
<Frame x:Name="xPageFrame"
Source="{Binding ViewPage}"
NavigationUIVisibility="Hidden"/>
</Grid>
Frame는 Source속성으로 페이지 컨텐츠를 지정해서 표시 할 수 있습니다. 이 속성을 사용해서 뷰 전환 처리를 할 수 있습니다.
Source속성도 DP(Dependency Property)이기에 바인딩 처리로 깔끔하게 처리가 가능합니다. 위 코드에선 ViewPage라는 속성으로 바인딩 처리를 하였습니다.
뷰 모델에서 ViewPage속성은 각 뷰의 경로 정보를 갖고 있는 Enum을 바인딩 해서 처리해 보겠습니다. [MainViewModel.cs] public class MainViewModel
{
public enum EViewPage
{
NONE,
[Description("Views\\뷰1.xaml")]
뷰1,
[Description("Views\\뷰2.xaml")]
뷰2
}
}
// 설명 목적으로 간략 처리, 실제 사용시에는 OnPropertyChanged등 구현이 되어 있어야 함
public EViewPage ViewPage
{
get;
set;
}
이렇게 EViewPage란 enum으로 화면에 경로를 정의하고 그 경로는 System.ComponentModel.DescriptionAttribute 어트리뷰트로 정의해봤습니다.
System.ComponentModel.DescriptionAttribute 어트리뷰트의 값을 리플렉션을 사용해서 값을 가져와 실제 바인딩 값으로 처리할 수 있습니다. 그럼 리플렉션을 이용해 컨버터를 구현해 보겠습니다.
using System;
using System.Collections.Generic;
using System.ComponentModel;

public class EnumDescriptionConverter<T> : EnumConverter
{
  public EnumDescriptionConverter() : base(typeof(T))
  {
  }

  public override bool CanConvertTo(ITypeDescriptorContext? context, Type destinationType)
  {
    return true;
  }

  public override object ConvertTo(ITypeDescriptorContext context, System.Globalization.CultureInfo culture, object value, Type destinationType)
  {
    FieldInfo fi = value.GetType().GetField(value.ToString());
    if(fi == null)
      return null;

    DescriptionAttribute[] attributes = (DescriptionAttribute[])fi.GetCustomAttributes(typeof(DescriptionAttribute), false);
    if (attributes.Length < 1)
    {
      return null;
    }
    else
    {
      string page = attributes[0].Description;
      return new Uri(page, UriKind.Relative);
    }
  }
}
기타 예외 처리 및 리플렉션 사용의 성능 고려 캐싱 처리 구현 등은 고려하지 않았지만 대략 위 처럼 컨버터를 구현할 수 있습니다.
그럼 Enum 이 정의된 부분에서 System.ComponentModel.TypeConverterAttribute 어트리뷰트를 이용해 위에서 구현한
컨버터가 바인딩 처리된 속성 부분이 화면에 렌더링 될때 자동으로 해당 컨버터 타입을 찾아서 호출해 줍니다. 다음과 같이 처리 하면 됩니다.
[TypeConverter(typeof(EnumDescriptionConverter<EViewPage>))]
public enum EViewPage
{
  NONE,
  [Description("Views\\뷰1.xaml")]
  뷰1,

  [Description("Views\\뷰2.xaml")]
  뷰2
}
이러면 Frame의 Source에는 바인딩 처리된 ViewPage의 Enum상수에 정의된 어트리뷰트 값이 설정 됩니다.
이렇게 해서 뷰의 전환은 위 ViewPage의 속성만 변경해 주면 자연스럽게 Frame에 의해 뷰가 전환 됩니다.
이 처럼 Frame을 사용한 뷰 전환은 뷰에 ViewModelLocator를 통해 뷰 모델을 설정하기 때문에 뷰 여러개와 뷰 모델 하나 N:1 로 사용 가능합니다.
그리고 Frame는 컨텐츠(View)의 Life Cycle을 자체 관리해서 화면 전환이 될때 컨텐츠 인스턴스를 메모리에서 정리하게 되고 해당 뷰 모델도 GC의 수집 대상이 되어집니다.
또한 Navigate시 화면 뒤로가기, 앞으로가기, 새로고침이 지원되서 Entry에 기록이 있다면 뷰를 새로 만들지 않고 재사용 시킬 수 있습니다. 그럼 다른 뷰 모델에서는 어떻게 처리 하면 될까요? 위 ‘뷰 전환 방법 1’에서 설명했던 Event Aggregator 패턴을 사용해 메인 뷰 모델의 ViewPage 속성 변경 통보를 발생
시킬 수 도 있지만 위에서 구현 했던 DI(Dependency Injection)를 사용하는 것이 좀 더 깔끔한 방법 입니다.
이런 방식은 객체 지향 설계 5원칙중 하나인 의존관계 역전 원칙 (Dependency inversion principle)중 하나인 방법 입니다. 그럼 Frame의 화면 전환 처리 역할을 하는 서비스를 하나 만들어서 이 서비스를 뷰 모델에 DI해서 사용할 수 있도록 처리해 보겠습니다. 우선 Frame 화면 전환을 하는 서비스를 구현해 보겠습니다.
[NavigationService.cs] using System;
using System.Windows.Controls;
using System.Windows;
public interface INavigationService
{
void SetNavigationService(System.Windows.Navigation.NavigationService navigationService);
void NavigateToPage(EViewPage page);
}
public class NavigationService : INavigationService
{
private static System.Windows.Navigation.NavigationService _navigationService;
public void SetNavigationService(System.Windows.Navigation.NavigationService navigationService)
{
_navigationService = navigationService;
}
public void NavigateToPage(EViewPagee page)
{
try
{
FieldInfo fi = page.GetType().GetField(page.ToString());
if(fi == null)
return;
DescriptionAttribute[] attributes = (DescriptionAttribute[])fi.GetCustomAttributes(typeof(DescriptionAttribute), false);
if (attributes.Length < 1)
{
return;
}
else
{
string pageUri = attributes[0].Description;
_navigationService.Navigate(new Uri(pageUri, UriKind.Relative));
}
}
catch (Exception ex)
{
// 로그 처리
}
}
}
위와 같이 Frame에 Navigate처리 하는 서비스를 구현해 보았고 이 서비스를 뷰 모델에 DI 하기 위해 IoC에 등록해 줍니다.
위에 만들었던 ViewModelLocator클래스의 생성자 부분에 다음과 같이 서비스를 등록합니다. ... [생략] ...
public ViewModelLocator()
{
base.Register<INavigationService>(() => new NavigationService());
}
... [생략] ...
그러면 이제 뷰 모델의 생성자 주입을 통해 INavigationService을 DI 받아 사용할 수 있습니다. 사용 방법은 이벤트 트리거를 이용해 메인 화면 로드 이후 Frame의 System.Windows.Navigation.NavigationService 를 위에 서비스에서 사용 할 수 있도록 넘겨 주면 됩니다. [MainWindow.xaml] <i:Interaction.Triggers>
<i:EventTrigger EventName="Loaded">
<i:InvokeCommandAction
Command="{Binding MainPageLoadedCommand}"
CommandParameter="{Binding ElementName=xPageFrame, Path=NavigationService}"/>
</i:EventTrigger>
</i:Interaction.Triggers>
[MainViewModel.cs] private readonly INavigationService _navigationService;
public MainViewModel(INavigationService navigationService)
{
_navigationService = navigationService;
}
public RelayCommand<System.Windows.Navigation.NavigationService> MainPageLoadedCommand
{
get
{
return _mainPageLoadedCommand ??
(_mainPageLoadedCommand = new RelayCommand<System.Windows.Navigation.NavigationService>(
(param) =>
{
_navigationService.SetNavigationService(param);
},
null));
}
}
이렇게 DI로 받은 INavigationService를 사용해서 Frame에 Navigate처리 할 수 있습니다.
_navigationService.NavigateToPage(EViewPage.뷰1;);
다른 뷰의 뷰 모델에서도 마찬가지로 INavigationService를 DI로 받아 사용 할 수 있습니다.
private readonly INavigationService _navigationService;
public 뷰1ViewModel(INavigationService navigationService)
{
  _navigationService = navigationService;
}
이렇게 MVVM 사용시 뷰 전환 방법에 대해 외부에서 뷰 모델 개체를 교체해서 DataTemplate의 DataType에 매칭시켜 뷰 전환 하는 방법과
Frame와 INavigationService를 구현해서 의존성 주입(DI) 방식을 통해 뷰 전환 방법에 대해 알아 보았습니다. 메세지 팝업창 처리MVVM사용에 있어 메세지 팝업 처리를 어떻게 해야 할지 고민하게 될 수 있습니다.
또 BCL로 제공 되는 System.Windows.MessageBox 를 사용하지 않고 커스텀한 메세지 팝업을 사용한다면
이 또한 고민이 됩니다. UI관련 비즈니스 로직은 뷰 모델에서 처리 하게 되는데 메세지 팝업 자체를 뷰로 분리를 하면 뷰 모델자체에서 메세지 팝업을 띄우는 것 자체가 뭔가 맞지 않은 느낌 입니다. 뷰 모델은 뷰 를 참조할 수 없으니깐요 이런 경우 각 뷰에서 필요한 메세지 팝업들을 미리 안보이게끔 가지고 있고 뷰 모델에서 상황에 맞게 해당 메세지 팝업을 표시 하도록 바인딩 처리 할 수도 있는데
메세지 팝업 표시를 모달로 처리를 해야 하는 경우 처리가 번거롭습니다. 커스텀된 메세지 팝업 이면서 System.Windows.MessageBox 처럼 메세지 팝업을
모달로 표시하고 정적으로 바로 쉽게 사용할 수 있도록 다음과 같이 구현해 보았습니다. 먼저 대략적으로 구현해야 할 부분을 나열해 보면
- 커스텀된 메세지 팝업, 즉 뷰 와 별개로 메세지 팝업을 위한 디자인 처리 필요
- 메세지 팝업은 모달로 표시
- 공통적으로 사용할 수 있도록
1번은 유저 컨트롤로 별도 구현해서 Style처리를 하고
2번은 메세지 팝업이 표시 될때 뒤 컨텐츠 영역을 딤(dim)처리 효과로 사용자가 조작할 수 없도록 처리 하겠습니다.
3번은 Behavior를 사용해서 뷰에 메세지 팝업을 바인딩 처리하고 뷰 모델에서 바인딩 통보를 통해 메세지 팝업 표시를
처리할 수 도 있지만 여기서는 메인 윈도우가 미리 메세지 팝업 컨트롤을 가지고 있고 System.Windows.Application 에서
메인 윈도우에 접근해 메세지 팝업을 표시 하도록 구현해 보겠습니다. 메세지 팝업 유저 컨트롤 구현[MessagePopUpBox.cs] using System;
using System.Windows;
using System.Windows.Controls;
using System.Windows.Controls.Primitives;
using System.Windows.Input;
public class MessagePopUpBox : UserControl
{
public enum EMessagePopUpBoxType
{
OK,
YesNo,
ConfirmDelete
}
public event RoutedEventHandler OKClick;
public event RoutedEventHandler CancelClick;
public event RoutedEventHandler DeleteClick;
public MessagePopUpBox()
{
DefaultStyleKey = typeof(MessagePopUpBox);
}
#region Control Dependency Properties
public static readonly DependencyProperty MessagePopUpBoxTypeProperty =
DependencyProperty.Register("MessagePopUpBoxType", typeof(EMessagePopUpBoxType), typeof(MessagePopUpBox));
public EMessagePopUpBoxType MessagePopUpBoxType
{
get { return (EMessagePopUpBoxType)this.GetValue(MessagePopUpBoxTypeProperty); }
set { this.SetValue(MessagePopUpBoxTypeProperty, value); }
}
public static readonly DependencyProperty IsOpenProperty =
DependencyProperty.Register("IsOpen", typeof(bool), typeof(MessagePopUpBox));
public bool IsOpen
{
get { return (bool)this.GetValue(IsOpenProperty); }
set { this.SetValue(IsOpenProperty, value); }
}
public static readonly DependencyProperty IsBackgroundDisableProperty =
DependencyProperty.Register("IsBackgroundDisable", typeof(bool), typeof(MessagePopUpBox), new PropertyMetadata(false));
public bool IsBackgroundDisable
{
get { return (bool)this.GetValue(IsBackgroundDisableProperty); }
set { this.SetValue(IsBackgroundDisableProperty, value); }
}
public static readonly DependencyProperty VAlignmentProperty =
DependencyProperty.Register("VAlignment", typeof(VerticalAlignment), typeof(MessagePopUpBox), new PropertyMetadata(VerticalAlignment.Bottom));
public VerticalAlignment VAlignment
{
get { return (VerticalAlignment)this.GetValue(VAlignmentProperty); }
set { this.SetValue(VAlignmentProperty, value); }
}
public static readonly DependencyProperty HAlignmentProperty =
DependencyProperty.Register("HAlignment", typeof(HorizontalAlignment), typeof(MessagePopUpBox), new PropertyMetadata(HorizontalAlignment.Right));
public HorizontalAlignment HAlignment
{
get { return (HorizontalAlignment)this.GetValue(HAlignmentProperty); }
set { this.SetValue(HAlignmentProperty, value); }
}
#endregion // Control Dependency Properties
#region Command Dependency Properties
public ICommand CancelCommand
{
get
{
return (ICommand)GetValue(CancelCommandProperty);
}
set
{
SetValue(CancelCommandProperty, value);
}
}
public object CancelCommandParameter
{
get { return (object)this.GetValue(CancelCommandParameterProperty); }
set { this.SetValue(CancelCommandParameterProperty, value); }
}
public ICommand DeleteCommand
{
get
{
return (ICommand)GetValue(DeleteCommandProperty);
}
set
{
SetValue(DeleteCommandProperty, value);
}
}
public object DeleteCommandParameter
{
get { return (object)this.GetValue(DeleteCommandParameterProperty); }
set { this.SetValue(DeleteCommandParameterProperty, value); }
}
public ICommand OKCommand
{
get
{
return (ICommand)GetValue(OKCommandProperty);
}
set
{
SetValue(OKCommandProperty, value);
}
}
public object OKCommandParameter
{
get { return (object)this.GetValue(OKCommandParameterProperty); }
set { this.SetValue(OKCommandParameterProperty, value); }
}
#endregion // Command Dependency Properties
#region Command Dependency Properties
public static readonly DependencyProperty CancelCommandProperty =
DependencyProperty.Register(
"CancelCommand",
typeof(ICommand),
typeof(MessagePopUpBox),
new UIPropertyMetadata(null));
public static readonly DependencyProperty CancelCommandParameterProperty =
DependencyProperty.RegisterAttached(
"CancelCommandParameter",
typeof(object),
typeof(MessagePopUpBox),
new UIPropertyMetadata(null));
public static readonly DependencyProperty DeleteCommandProperty =
DependencyProperty.Register(
"DeleteCommand",
typeof(ICommand),
typeof(MessagePopUpBox),
new UIPropertyMetadata(null));
public static readonly DependencyProperty DeleteCommandParameterProperty =
DependencyProperty.RegisterAttached(
"DeleteCommandParameter",
typeof(object),
typeof(MessagePopUpBox),
new UIPropertyMetadata(null));
public static readonly DependencyProperty OKCommandProperty =
DependencyProperty.Register(
"OKCommand",
typeof(ICommand),
typeof(MessagePopUpBox),
new UIPropertyMetadata(null));
public static readonly DependencyProperty OKCommandParameterProperty =
DependencyProperty.RegisterAttached(
"OKCommandParameter",
typeof(object),
typeof(MessagePopUpBox),
new UIPropertyMetadata(null));
#endregion // Command Dependency Properties
public override void OnApplyTemplate()
{
base.OnApplyTemplate();
Button cancelBtn = GetTemplateChild("xCancelBtn") as Button;
cancelBtn.Click += new RoutedEventHandler(delegate (Object s, RoutedEventArgs e)
{
IsOpen = false;
if (CancelClick != null)
CancelClick(this, new RoutedEventArgs());
});
Button deleteBtn = GetTemplateChild("xDeleteBtn") as Button;
deleteBtn.Click += new RoutedEventHandler(delegate (Object s, RoutedEventArgs e)
{
IsOpen = false;
if (DeleteClick != null)
DeleteClick(this, new RoutedEventArgs());
});
Button okBtn = GetTemplateChild("xOKBtn") as Button;
okBtn.Click += new RoutedEventHandler(delegate (Object s, RoutedEventArgs e)
{
IsOpen = false;
if (OKClick != null)
OKClick(this, new RoutedEventArgs());
});
Button yesBtn = GetTemplateChild("xYesBtn") as Button;
yesBtn.Click += new RoutedEventHandler(delegate (Object s, RoutedEventArgs e)
{
IsOpen = false;
if (OKClick != null)
OKClick(this, new RoutedEventArgs());
});
Button noBtn = GetTemplateChild("xNoBtn") as Button;
noBtn.Click += new RoutedEventHandler(delegate (Object s, RoutedEventArgs e)
{
IsOpen = false;
if (CancelClick != null)
CancelClick(this, new RoutedEventArgs());
});
}
}
메세지 팝업 유저 컨트롤에는 5개의 의존 프로터피가 노출 되어 있습니다. 메세지 팝업 버튼이 [예] 또는 [예] / [아니오] / 등 종류를 설정 할 수 있는 MessagePopUpBoxType 속성과 메세지 팝업을 표시 하기 위한 IsOpen 의존 프로퍼티 그리고 메세지 팝업이 표시 될때 뒷 컨텐츠 영역을 dim처리 효과를 사용 안할지 여부 IsBackgroundDisable 의존 프로퍼티 메세지 팝업이 표시 될때 화면에 표시 되는 정렬 속성인 VAlignment와 HAlignment 의존 프로퍼티가 있습니다. 그리고 각 메세지 팝업 버튼에서 Command로 바인딩해서 사용할 수 있도록
(CancelCommand / CancelCommandParameter), (DeleteCommand / DeleteCommandParameter), (OKCommand / OKCommandParameter) 의존 프로퍼티를 구현 했고 메세지 팝업 버튼 클릭시 동작하는 이벤트 핸들러를 OKClick / CancelClick / DeleteClick의 RoutedEventHandler까지 구현 했습니다.
그리고 메세지 팝업의 종류별로(EMessagePopUpBoxType) Enum타입에 따라 버튼 영역을 Visibility 처리를 위한 컨버터가 필요 합니다.
[EnumToVisibilityConverter.cs] using System;
using System.Windows;
using System.Windows.Data;
public class EnumToVisibilityConverter : IValueConverter
{
public object Convert(
object value,
Type targetType,
object parameter,
System.Globalization.CultureInfo culture)
{
string strEnum = value.ToString();
if (parameter != null && parameter.ToString().Equals(strEnum))
{
return Visibility.Visible;
}
else
{
return Visibility.Collapsed;
}
}
public object ConvertBack(
object value,
Type targetType,
object parameter,
System.Globalization.CultureInfo culture)
{
return null;
}
}
이렇게 구현한 메세지 팝업 컨트롤을 위한 Style은 다음과 같이 구현했습니다.
[Themes/Generic.xaml] <ResourceDictionary xmlns="http://schemas.microsoft.com/winfx/2006/xaml/presentation"
xmlns:x="http://schemas.microsoft.com/winfx/2006/xaml"
xmlns:con="clr-namespace:SimpleMVVMWpf.Converter"
xmlns:ct="clr-namespace:SimpleMVVMWpf.Common.Controls">
<con:EnumToVisibilityConverter x:Key="EnumToVisConverter" />
<BooleanToVisibilityConverter x:Key="BoolToVisConverter" />
<Style TargetType="{x:Type ct:MessagePopUpBox}"> <!--메세지 팝업 유저 컨트롤 타입-->
<Setter Property="Template">
<Setter.Value>
<ControlTemplate TargetType="{x:Type ct:MessagePopUpBox}">
<Popup x:Name="xMsgPopUp"
Visibility="{Binding Path=IsOpen, RelativeSource={RelativeSource TemplatedParent}, Converter={StaticResource BoolToVisConverter}}"
Placement="Center"
PlacementTarget="{Binding RelativeSource={RelativeSource TemplatedParent}}"
AllowsTransparency="True">
<Popup.Style>
<Style TargetType="Popup">
<Style.Triggers>
<DataTrigger Binding="{Binding Path=IsOpen, RelativeSource={RelativeSource TemplatedParent}}" Value="False">
<Setter Property="IsOpen" Value="False" />
</DataTrigger>
<MultiDataTrigger>
<MultiDataTrigger.Conditions>
<Condition Binding="{Binding Path=IsOpen, RelativeSource={RelativeSource TemplatedParent}}" Value="True" />
</MultiDataTrigger.Conditions>
<Setter Property="IsOpen" Value="True" />
</MultiDataTrigger>
</Style.Triggers>
</Style>
</Popup.Style>
<Grid x:Name="xMsgGrid"
Height="{Binding RelativeSource={RelativeSource TemplatedParent}, Path=ActualHeight}"
Width="{Binding RelativeSource={RelativeSource TemplatedParent}, Path=ActualWidth}"
HorizontalAlignment="Stretch"
VerticalAlignment="Stretch">
<Grid Background="#FF000000"
HorizontalAlignment="Stretch"
VerticalAlignment="Stretch"
Opacity="0.5">
<Grid.Style>
<Style TargetType="Grid">
<Setter Property="Visibility" Value="Collapsed" />
<Style.Triggers>
<DataTrigger Binding="{Binding Path=IsOpen, RelativeSource={RelativeSource TemplatedParent}}" Value="False">
<Setter Property="Visibility" Value="Collapsed" />
</DataTrigger>
<MultiDataTrigger>
<MultiDataTrigger.Conditions>
<Condition Binding="{Binding Path=IsOpen, RelativeSource={RelativeSource TemplatedParent}}" Value="True" />
<Condition Binding="{Binding Path=IsBackgroundDisable, RelativeSource={RelativeSource TemplatedParent}}" Value="False" />
</MultiDataTrigger.Conditions>
<Setter Property="Visibility" Value="Visible" />
</MultiDataTrigger>
</Style.Triggers>
</Style>
</Grid.Style>
</Grid>
<Border RenderTransformOrigin="0.5,0.5">
<!--팝업 창 효과 Style-->
<Border.Style>
<Style TargetType="Border">
<Style.Triggers>
<DataTrigger Binding="{Binding Path=IsOpen, RelativeSource={RelativeSource TemplatedParent}}" Value="True">
<DataTrigger.EnterActions>
<BeginStoryboard>
<Storyboard>
<DoubleAnimationUsingKeyFrames Storyboard.TargetProperty="(UIElement.RenderTransform).(ScaleTransform.ScaleX)">
<EasingDoubleKeyFrame KeyTime="0:0:0.0" Value="0" />
<EasingDoubleKeyFrame KeyTime="0:0:0.3" Value="1" />
</DoubleAnimationUsingKeyFrames>
<DoubleAnimationUsingKeyFrames Storyboard.TargetProperty="(UIElement.RenderTransform).(ScaleTransform.ScaleY)">
<EasingDoubleKeyFrame KeyTime="0:0:0.0" Value="0" />
<EasingDoubleKeyFrame KeyTime="0:0:0.3" Value="1" />
</DoubleAnimationUsingKeyFrames>
</Storyboard>
</BeginStoryboard>
</DataTrigger.EnterActions>
<DataTrigger.ExitActions>
<BeginStoryboard>
<Storyboard>
<DoubleAnimationUsingKeyFrames Storyboard.TargetProperty="(UIElement.RenderTransform).(ScaleTransform.ScaleX)">
<EasingDoubleKeyFrame KeyTime="0:0:0.0" Value="1" />
<EasingDoubleKeyFrame KeyTime="0:0:0.3" Value="0" />
</DoubleAnimationUsingKeyFrames>
<DoubleAnimationUsingKeyFrames Storyboard.TargetProperty="(UIElement.RenderTransform).(ScaleTransform.ScaleY)">
<EasingDoubleKeyFrame KeyTime="0:0:0.0" Value="1" />
<EasingDoubleKeyFrame KeyTime="0:0:0.3" Value="0" />
</DoubleAnimationUsingKeyFrames>
</Storyboard>
</BeginStoryboard>
</DataTrigger.ExitActions>
</DataTrigger>
</Style.Triggers>
</Style>
</Border.Style>
<!--팝업 창 효과 Style END-->
<Border.RenderTransform>
<ScaleTransform x:Name="xBorderScale" ScaleX="0" ScaleY="0" />
</Border.RenderTransform>
<Grid VerticalAlignment="{Binding Path=VAlignment, RelativeSource={RelativeSource TemplatedParent}}"
HorizontalAlignment="{Binding Path=HAlignment, RelativeSource={RelativeSource TemplatedParent}}">
<Grid.RowDefinitions>
<RowDefinition Height="*" />
<RowDefinition Height="Auto" />
</Grid.RowDefinitions>
<Border Grid.RowSpan="2"
Background="#FFFFFFFF" />
<ContentPresenter Grid.Row="0"
Margin="0, 50, 0, 40" />
<StackPanel x:Name="xYesNoMessageBox"
Grid.Row="1"
Orientation="Horizontal"
HorizontalAlignment="Center"
Visibility="{Binding Path=MessagePopUpBoxType, RelativeSource={RelativeSource TemplatedParent}, Converter={StaticResource EnumToVisConverter}, ConverterParameter=YesNo}"
Margin="50, 0, 50, 30">
<Button x:Name="xYesBtn"
Width="160"
Height="50"
HorizontalAlignment="Center"
Background="#FF222222"
Foreground="#FFFFFFFF"
FontSize="26"
FontWeight="Bold"
Command="{Binding OKCommand, RelativeSource={RelativeSource TemplatedParent}}"
CommandParameter="{Binding OKCommandParameter, RelativeSource={RelativeSource TemplatedParent}}"
Margin="0, 0, 10, 0"
Style="{DynamicResource NormalButtonStyle}">
<TextBlock Text="예"
HorizontalAlignment="Center"
VerticalAlignment="Center" />
</Button>
<Button x:Name="xNoBtn"
Width="160"
Height="50"
HorizontalAlignment="Center"
Background="#FFBC2230"
Foreground="#FFFFFFFF"
FontSize="26"
FontWeight="Bold"
Command="{Binding CancelCommand, RelativeSource={RelativeSource TemplatedParent}}"
CommandParameter="{Binding CancelCommandParameter, RelativeSource={RelativeSource TemplatedParent}}"
Margin="0, 0, 0, 0"
Style="{DynamicResource NormalButtonStyle}">
<TextBlock Text="아니오"
HorizontalAlignment="Center"
VerticalAlignment="Center" />
</Button>
</StackPanel>
<StackPanel x:Name="xConfirmDeleteMessageBox"
Grid.Row="1"
Orientation="Horizontal"
HorizontalAlignment="Center"
Visibility="{Binding Path=MessagePopUpBoxType, RelativeSource={RelativeSource TemplatedParent}, Converter={StaticResource EnumToVisConverter}, ConverterParameter=ConfirmDelete}"
Margin="50, 0, 50, 30">
<Button x:Name="xCancelBtn"
Width="160"
Height="50"
HorizontalAlignment="Center"
Background="#FF222222"
Foreground="#FFFFFFFF"
FontSize="26"
FontWeight="Bold"
Command="{Binding CancelCommand, RelativeSource={RelativeSource TemplatedParent}}"
CommandParameter="{Binding CancelCommandParameter, RelativeSource={RelativeSource TemplatedParent}}"
Margin="0, 0, 10, 0"
Style="{DynamicResource NormalButtonStyle}">
<TextBlock Text="취소"
HorizontalAlignment="Center"
VerticalAlignment="Center" />
</Button>
<Button x:Name="xDeleteBtn"
Width="160"
Height="50"
HorizontalAlignment="Center"
Background="#FFBC2230"
Foreground="#FFFFFFFF"
FontSize="26"
FontWeight="Bold"
Command="{Binding DeleteCommand, RelativeSource={RelativeSource TemplatedParent}}"
CommandParameter="{Binding DeleteCommandParameter, RelativeSource={RelativeSource TemplatedParent}}"
Margin="0, 0, 0, 0"
Style="{DynamicResource NormalButtonStyle}">
<TextBlock Text="삭제"
HorizontalAlignment="Center"
VerticalAlignment="Center" />
</Button>
</StackPanel>
<StackPanel x:Name="xOKMessageBox"
Grid.Row="1"
Orientation="Horizontal"
HorizontalAlignment="Center"
Visibility="{Binding Path=MessagePopUpBoxType, RelativeSource={RelativeSource TemplatedParent}, Converter={StaticResource EnumToVisConverter}, ConverterParameter=OK}"
Margin="50, 0, 50, 30">
<Button x:Name="xOKBtn"
Width="240"
Height="80"
HorizontalAlignment="Center"
Background="#FFBC2230"
Foreground="#FFFFFFFF"
FontSize="30"
FontWeight="Bold"
Command="{Binding OKCommand, RelativeSource={RelativeSource TemplatedParent}}"
CommandParameter="{Binding OKCommandParameter, RelativeSource={RelativeSource TemplatedParent}}"
Margin="0, 0, 10, 0"
Style="{DynamicResource NormalButtonStyle}">
<TextBlock Text="확인"
HorizontalAlignment="Center"
VerticalAlignment="Center" />
</Button>
</StackPanel>
</Grid>
</Border>
</Grid>
</Popup>
</ControlTemplate>
</Setter.Value>
</Setter>
</Style>
</ResourceDictionary>
Style에 메세지 팝업의 애니메이션 효과를 같이 적용해서 약간 복잡해보이는데 Popup을 이용해서 메세지 팝업의 Content를 표시 하는 Style입니다.
Content가 표시되는 부분은 ContentPresenter로 위치를 지정시켜줄 수 있습니다. 그리고 메세지 팝업의 종류별로(EMessagePopUpBoxType의 Enum타입) 미리 버튼의 영역([확인] / [예], [아니오] / 등)을 구성해 놓고
EnumToVisConverter 컨버터로 각 타입에 맞게 Visibility처리 합니다. 또한 IsBackgroundDisable 의존 프로퍼티의 값에 따라 메세지 팝업이 표시 될때 검은 배경색과 불투명도 0.5인 Grid를 뒤에 표시해서
dim처리로 뒷 부분 컨텐츠는 사용자가 조작할 수 없도록 처리했습니다.
IsBackgroundDisable 기본 값을 False로 해서 해당 속성 설정이 없어도 기본적으로 dim처리가 되고 True인 경우 dim처리 없이 그냥 메세지 팝업만 표시 되도록 했습니다. 메세지 팝업 컨트롤 사용하기이렇게 구현된 메세지 팝업 컨트롤은 메인 윈도우에 미리 메세지 팝업의 타입별로 모두 미리 정의해 놓고 IsPoen 속성으로 표시할 수 있습니다.
[MainWindow.xaml] ... [생략] ...
<!--확인 메세지-->
<ct:MessagePopUpBox x:Name="xMsgBox_OK"
HAlignment="Center"
VAlignment="Center"
MessagePopUpBoxType="Confirm">
메세지 내용 컨텐츠 구현 (TextBlock 등 사용)
</ct:MessagePopUpBox>
<!--확인 메세지 END-->
<!--예, 아니오 메세지-->
<ct:MessagePopUpBox x:Name="xMsgBox_YesNo"
HAlignment="Center"
VAlignment="Center"
MessagePopUpBoxType="YesNo">
메세지 내용 컨텐츠 구현 (TextBlock 등 사용)
</ct:MessagePopUpBox>
<!--확인 메세지 END-->
그리곤 메인 윈도우 코드 비하인드에서 xaml에 정의한 위 메세지 팝업 컨트롤들을 표시하는 메서드를 구현해서 노출 시켜 주면 됩니다.
[MainWindow.xaml.cs] // [확인] 버튼 타입의 메세지 팝업 처리
public void ShowMessageBox(string message, Action callback)
{
// 표시할 message값을 받아서 메세지 팝업 컨텐츠 영역에 처리
this.xMsgBox_OK.OKClick += (s, e) =>
{
callback();
}
this.xMsgBox_OK.IsOpen = true;
}
// [예] [아니오] 버튼 타입의 메세지 팝업 처리
public void ShowMessageBox(string message, Action<bool> callback)
{
// 표시할 message값을 받아서 메세지 팝업 컨텐츠 영역에 처리
this.xMsgBox_YesNo.YesClick += (s, e) =>
{
callback(true);
}
this.xMsgBox_YesNo.NoClick += (s, e) =>
{
callback(false);
}
this.xMsgBox_YesNo.IsOpen = true;
}
대략 이런식으로 메세지 팝업을 표시 하는 메서드를 구현해서 노출 시켜줄 수 있습니다.
이렇게 구현된 메인 윈도우의 메서드를 System.Windows.Application 에서 정적 메서드를 통해 접근할 수 있도록 처리 하면 상황에 맞게 바로 접근해서 호출할 수 있습니다. [App.xaml.cs] // [확인] 버튼 타입의 메세지 팝업 처리
public static void ShowMessageBox(string message, Action callback)
{
if (App.Current.MainWindow != null && App.Current.MainWindow is MainWindow)
{
((MainWindow)App.Current.MainWindow).ShowMessageBox(message, callback);
}
}
// [예] [아니오] 버튼 타입의 메세지 팝업 처리
public static void ShowMessageBox(string message, Action<bool> callback)
{
if (App.Current.MainWindow != null && App.Current.MainWindow is MainWindow)
{
((MainWindow)App.Current.MainWindow).ShowMessageBox(message, callback);
}
}
UI 관련 비즈니스 로직이 존재하는 뷰 모델에서 바로 App.ShowMessageBox() 로 호출해서 사용할 수 있도록 편해 졌지만
한편으론 뷰 모델이 간접적으로 System.Windows.Application 를 통해 메인 윈도우를 참조 하는 것과 같습니다. 이 부분은 공통 적으로 사용하는 메세지 팝업임을 감안 해서 반드시 MVVM 패턴에 맞게 처리해야 한다기 보단 현실적 타협(?)으로 시간 단축을 할 수 있는 빠른 개발 방법
으로 처리 하는 것도 나쁘진 않습니다. 그렇지 않으면 위에 구현했던 메세지 팝업을 컨트롤 할 수 있는 서비스를 만들어 의존성 주입(DI)을 받아 뷰 모델에서 처리 하는 방법도 있습니다.
|